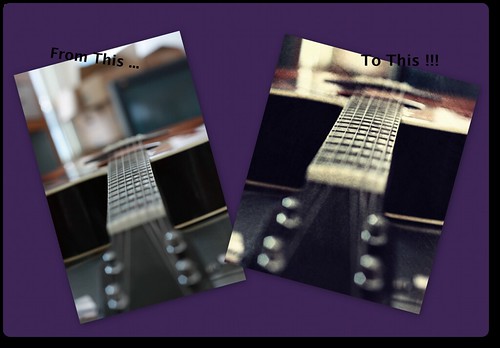
oooooh.. the 50 mm goodness!!
Okay , so you have a nice picture. And you want to ruin it.
This is one of the way it can be done, as I figured it out Yesterday!
Load up the original pic in to GIMP.
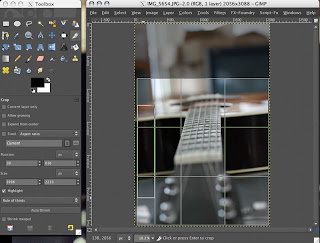
Crop the pic if needed ... I usually try to abide by the "Rule of Thirds". Though I have no idea if that has any effect for this particular picture...
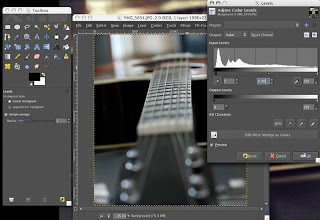
The next step I do in GIMP, is to play around with "Levels" (Colour -> Levels). Usually I can remove the haze in the pics, increase the dynamic range of colors. There is a handy "Auto" button, which sometime gives amazing results :-)
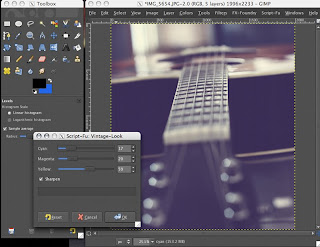
So, remember, as I said I am not trying to make this pic look pretty, but "Interesting" :-)
So, Lemme see what I get if I use "Vintage Look" script.
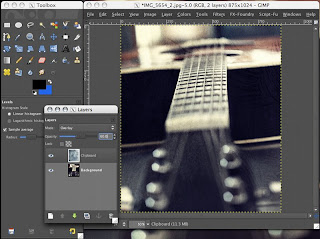
Okay, this ain't that good. So I am gonna play with the "Layers" a bit. This Vintage script does nothing but adding 4 layers with different "Vintage" colors ...

As you can see, I changed the "Opacity" to different values, to make the pic look little darker.
Okay, Now we have somewhat okay pic. Lets add a texture for this. I've downloaded some textures from interwebs. Google is your friend.
Actually I've no idea how other people do it, and this is how I did it :-)
Open the texture as a layer, change the mode to "Overlay". Oh before that, I made both the pic and texture same size. There should be a way to work with different sized layers, but I didn't look around for that...
So, I've changed the opacity to some lower value, then Flattened the image. Then played around with "Layers" again. Finally I got this:
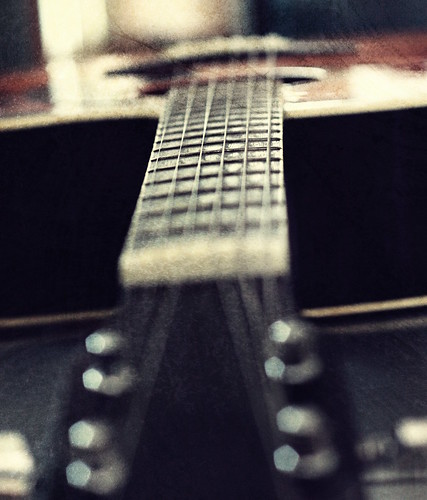
Neat ha?

Crop the pic if needed ... I usually try to abide by the "Rule of Thirds". Though I have no idea if that has any effect for this particular picture...

The next step I do in GIMP, is to play around with "Levels" (Colour -> Levels). Usually I can remove the haze in the pics, increase the dynamic range of colors. There is a handy "Auto" button, which sometime gives amazing results :-)
So, remember, as I said I am not trying to make this pic look pretty, but "Interesting" :-)
So, Lemme see what I get if I use "Vintage Look" script.

Okay, this ain't that good. So I am gonna play with the "Layers" a bit. This Vintage script does nothing but adding 4 layers with different "Vintage" colors ...

As you can see, I changed the "Opacity" to different values, to make the pic look little darker.
Okay, Now we have somewhat okay pic. Lets add a texture for this. I've downloaded some textures from interwebs. Google is your friend.
Actually I've no idea how other people do it, and this is how I did it :-)
Open the texture as a layer, change the mode to "Overlay". Oh before that, I made both the pic and texture same size. There should be a way to work with different sized layers, but I didn't look around for that...

So, I've changed the opacity to some lower value, then Flattened the image. Then played around with "Layers" again. Finally I got this:
Neat ha?