Wednesday, December 16, 2009

Transform an ugly pic to an awesome pic !!

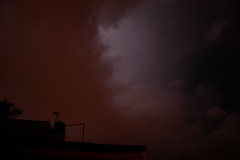
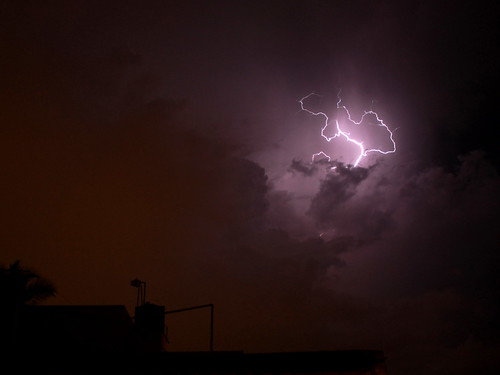
Okay, this is a pic I shot in Goa ...

well, after a couple of beers, hence the tilt :-)

Now,

It looked like an ordinary pic for me at the first look. I ignored it for a long time. After I ran out of all the pics to post in my flickr page, I looked at this back again.

This is what I did for this pic:

1. Fire up GIMP , open the pic.


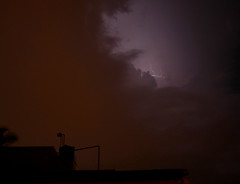
2. Before I start anything, I would correct the tilt.
For that you have to drag the ruler to required place from either top of the pic or from left side of the pic opened in GIMP.


3. Now open the Rotate tool box from Tools ->Transform Tools -> Rotate
Or Press Shift + r

Use the arrow keys to correct the tilt.

4. Now to crop the pic. Press Shift+c to get the crop tool. I usually select 'Rule Of Third' guides in the tool box to visualize my crop.


5. Oh, if you wan to remove the guide from the image, go to Image -> Guides -> Remove All Guides.

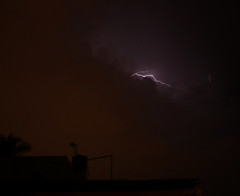
Now once we have the correct crop and tilt, lets get to fix the pic. This pic was shot through the glass pane of the bar, so it has a lot of noise already. I know there are quite few way to fix the noise, but I am not getting in to that business. So, I think for a while. See, there is hardly any colors in the pic. So, me thinks it would make a good black and white pic. But converting it to BW now would enhance the noise, so I have to do something about that.

So, let's change the levels. Go to Colors -> Levels.
Start playing around. Before you play around with levels, you should understand how levels control works. Quick googling should help you out :-)

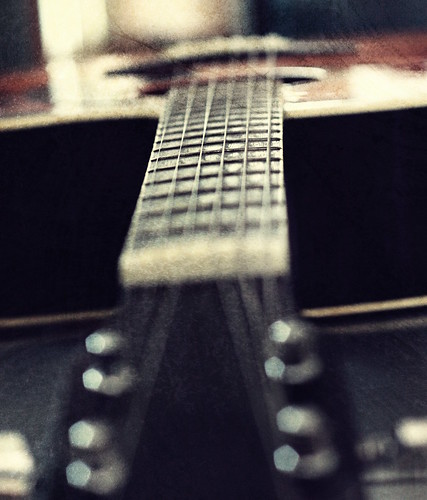
This is what I came up with


Essentially what I did is I moved the darkest point in pic from pitch dark to slightly brighter shade of gray. Also moved the brightest (most white) point to not so white point in the pic. So small noises have disappeared, the reflection of light have brightened.

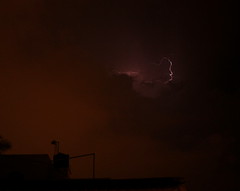
6. Now. let's try Black and White. There are multiple ways of converting a color pic to black and white in GIMP. Simplest one is one click 'Desaturate'. Go to Colors -> Desaturate.


Select any of the shade of gray that please you.

7. Then I sharpened the pic a bit. Filters -> Enhance -> Sharpen.

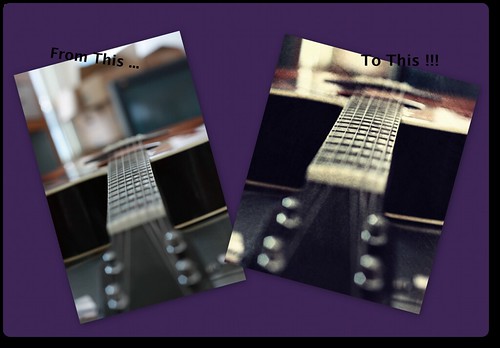
8. And ..... *Drum Roll* ... here is the final pic:


Three Empty Glasses ...

What say?

How to shoot lightning !

or to be precise, how I managed to capture lighting on my camera :-)

Okay, this might be a lengthy post, you've been warned ...

So, another weekend, and as usual I am wondering what to do. But today, Bangalore weather has been nice... It started to drizzle in the evening. And lighting ...

So I took my camera out, put my 18-55 mm lens on that, and set it up on my rarely used tripod.

Alright, lightning was predominant on east side and sky was full of clouds :( Once in a while I could see lightning clearly, but had no idea how to shoot it.

So, I set my shutter speed to max, ie 30 seconds and to compensate that I kept the aperture to low. f22 me thinks.

But, no luck. All I could capture was some light pollution from Bangalore night sky and some residual light from the lightnings. Even after 5-6 attempts.

IMG_1204

Clearly, higher exposure was not going work.

And I started to lower the exposure gradually, still no luck. And now clouds were moving towards south. And it started to drizzle heavily.

Armed with an umbrella, I continued on my quest to capture the elusive lighting.

By now, I changed my tactics from longer exposure to very short exposure. Like 0.8 sec at f5.6

Then there was a silver line over the clouds. Literally !!

IMG_1203

So, the trick I used is to click continuously, with highest exposure that is less than a second. Because, for exposure longer than a second, the de-noise mechanism on my camera starts. Ie, once a shot with 1 sec exposure is taken, it would not allow me to take another shot immediately. Though I can disable it, I didn't want to.


Finally after around 200 clicks I got my first shot with a lightning.


And after some more clicking, here is the best I could capture !!


IMG_1140_sharp

All these pics are in my flickr page, which you can find here ...

If you know a better way to capture lightnings, please do let me know...

I am happy :-)

Thursday, February 26, 2009

How to Ruin a good picture by adding Texture and Changing colors in GIMP


oooooh.. the 50 mm goodness!!

Okay , so you have a nice picture. And you want to ruin it.
This is one of the way it can be done, as I figured it out Yesterday!

Load up the original pic in to GIMP.


Crop the pic if needed ... I usually try to abide by the "Rule of Thirds". Though I have no idea if that has any effect for this particular picture...


The next step I do in GIMP, is to play around with "Levels" (Colour -> Levels). Usually I can remove the haze in the pics, increase the dynamic range of colors. There is a handy "Auto" button, which sometime gives amazing results :-)

So, remember, as I said I am not trying to make this pic look pretty, but "Interesting" :-)
So, Lemme see what I get if I use "Vintage Look" script.


Okay, this ain't that good. So I am gonna play with the "Layers" a bit. This Vintage script does nothing but adding 4 layers with different "Vintage" colors ...


As you can see, I changed the "Opacity" to different values, to make the pic look little darker.

Okay, Now we have somewhat okay pic. Lets add a texture for this. I've downloaded some textures from interwebs. Google is your friend.

Actually I've no idea how other people do it, and this is how I did it :-)
Open the texture as a layer, change the mode to "Overlay". Oh before that, I made both the pic and texture same size. There should be a way to work with different sized layers, but I didn't look around for that...


So, I've changed the opacity to some lower value, then Flattened the image. Then played around with "Layers" again. Finally I got this:


The Guitar ...

Neat ha?